Prepare a Sketch for Floor Plan Conversion
Follow a step-by-step checklist to photograph, label, and clean up a rough sketch before uploading it for floor plan conversion.
 Make Floor Plan Team
A rough sketch does not need to look professional before you convert it into a floor plan. It does need to communicate the shape of the space clearly. Strong wall lines, readable openings, and a straight photograph matter more than decorative detail.
Use this checklist before uploading a hand drawing, marked-up listing plan, or scanned layout.
Convert it without choosing the file twice
Upload your sketch here
Choose a complete sketch now. We will carry it into the converter so you can review the options and generate the first result.
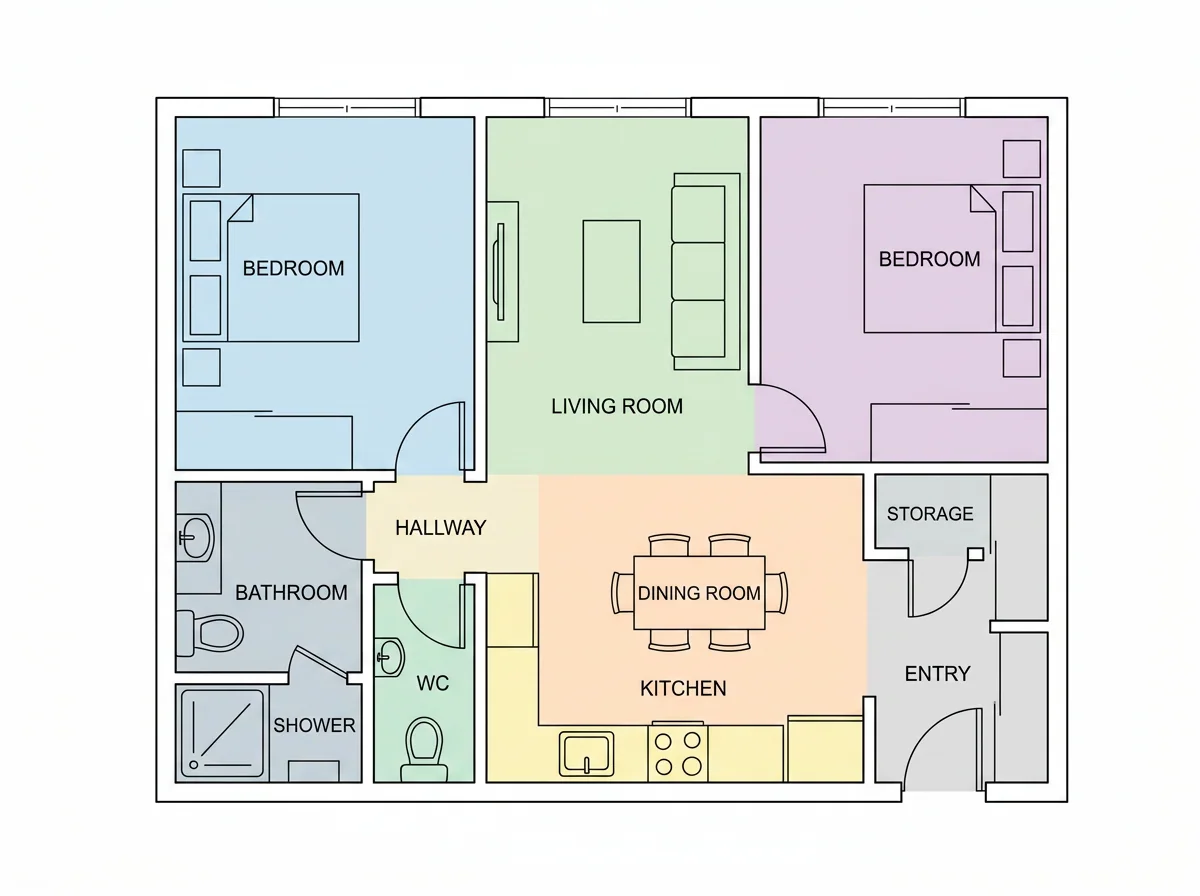
Example: the result from one verified live conversion of the pencil sketch.
A verified sketch-to-plan example
On August 25, 2026, we uploaded the pencil sketch below to the live Make Floor Plan converter and selected Colored 2D, 1K, and a 4:3 output. The second image is the result returned by that same run—not a separately chosen gallery image.
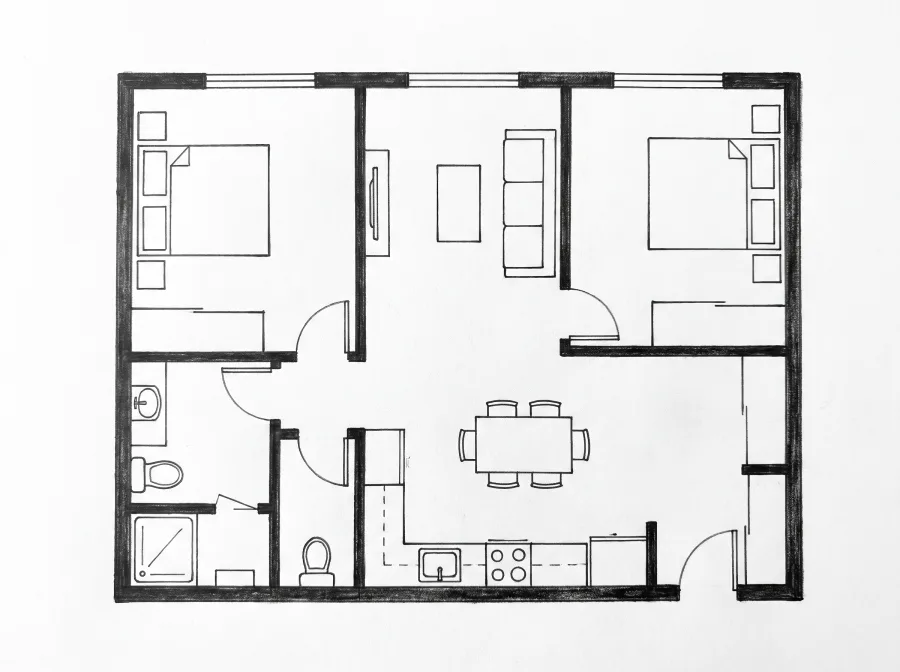
Input: a readable two-bedroom pencil sketch photographed square-on.
Output: the same layout interpreted as a clean colored planning image.
The conversion kept the two bedrooms, central living area, kitchen and dining zone, lower-left wet rooms, and right-side entry. It also straightened the walls and added readable labels and furniture. The output still needs review: confirm the storage/entry interpretation, door swings, room names, and every dimension against the source.
Watch the verified before-and-after
The source and result are from the same verified live run. The short fade between them is an illustrative comparison, not a real-time recording of the generation wait.
How this guide was verified
The Make Floor Plan Team prepared this guide and tested the workflow on the live product on August 25, 2026. We retained the actual source and returned image, recorded the selected settings, and listed the interpretations that still require human review. We do not present the result as a survey or construction drawing.
Ready to convert your sketch?
Upload one complete floor sketch and review the first result before refining labels or visual style.
Check whether the sketch is ready
Input signal | Ready to upload | Fix first |
|---|---|---|
Outer boundary | One continuous, visible footprint | Overlapping alternatives or missing edges |
Internal walls | Partitions connect cleanly | Abandoned lines, shadows, or accidental gaps |
Doors and windows | One consistent symbol style | Openings look like breaks or annotations |
Room labels | Short labels sit inside clear spaces | Text crosses walls, doors, or dimensions |
Photograph | Square, sharp, evenly lit, and tightly cropped | Perspective, glare, blur, or desk clutter |
Measurements | A few stated dimensions use one unit | Dense strings or guessed values presented as exact |
Passing this check improves readability; it does not guarantee that an AI conversion will reproduce every construction condition.
Draw one clear outer boundary
Start with the exterior shape of the area you are planning. Use a dark pen or pencil and keep the outer boundary continuous wherever possible.
Avoid:
- Repeated sketch lines around the same wall
- Decorative shading that looks like a room boundary
- Notes written directly across walls
- Multiple alternatives drawn on top of each other
If you are comparing two ideas, make two sketches. A conversion tool cannot reliably know which overlapping line is the intended wall.
Make internal walls distinct
Internal partitions should connect cleanly to the outer boundary or to another wall. Erase abandoned lines and close accidental gaps.
Perfectly straight lines are not required, but the drawing should make it obvious which marks are walls and which are annotations. A ruler helps on long edges, especially when several rooms share one alignment.
Mark doors and windows consistently
Doors and windows carry important circulation information. Use one symbol style throughout the sketch.
For doors:
- Show the opening in the wall.
- Add a simple swing arc when the direction matters.
- Distinguish a hinged door from a sliding opening.
For windows:
- Place the window mark inside the wall line.
- Keep the symbol clearly different from a door gap.
- Note full-height glazing or a balcony opening when relevant.
If an opening is uncertain, label it rather than drawing several possible versions.
If you are unsure how to draw an opening consistently, compare it with the floor plan symbols guide before uploading.
Add room labels outside busy areas
Write one short label in the center of each room: bedroom, kitchen, bath, storage, and so on. Keep text away from doors, windows, dimensions, and furniture.
Room labels help a conversion system interpret enclosed areas, but they should not replace visible boundaries. A room called “bedroom” still needs a readable perimeter.
Include a small number of useful measurements
Measurements help with proportion, but a sketch covered in dimension strings becomes difficult to read.
Include:
- One overall width and depth
- Critical room dimensions
- The location of a fixed entrance
- Any wall that cannot move
Write dimensions outside the plan when possible and use one unit consistently. If a measurement is estimated, mark it as approximate.
After conversion, use the online floor plan editor to review labels and visual annotations without treating the generated dimensions as survey data.
Photograph the sketch from directly above
Perspective distortion is one of the most common reasons a clean sketch converts poorly. Put the paper on a flat surface and hold the camera parallel to it.
Before uploading:
- Use bright, even light.
- Avoid shadows from your hand or phone.
- Make sure all four corners are visible.
- Crop out the desk, tools, and unrelated notes.
- Check that small labels remain readable.
A high-resolution phone photo is usually sufficient. The important part is a sharp, square view.
Clean up a scanned or existing plan
If you are starting from an old listing plan or scanned PDF, remove information that competes with the layout:
- Agent logos and promotional text
- Colored highlights
- Handwritten comments that are no longer relevant
- Page borders and title blocks
- Duplicate furniture symbols
Do not remove structural information you still need. The goal is visual clarity, not an empty drawing.
Check the converted plan in layers
Review the result in this order:
- Exterior footprint
- Interior walls
- Doors and windows
- Room labels
- Relative room proportions
This sequence makes errors easier to diagnose. If the footprint is wrong, correcting furniture or labels first will not help.
Remember that conversion produces a visual planning result, not a measured survey. Confirm dimensions and construction conditions separately.
If the 2D structure is correct and you want to evaluate presentation or circulation, continue with the floor plan to 3D tool.
Ready for a first-pass conversion?
Upload the complete sketch, generate one review image, then compare the footprint, openings, labels, and proportions in that order.
Frequently asked questions
Can I use a phone photo instead of a scanned sketch?
Yes. A sharp phone photo taken square-on in even light is usually enough. Keep all four corners visible and crop away the desk or unrelated notes.
Which sketch file formats can I upload?
The sketch converter accepts JPG, PNG, WebP, and PDF files up to 20 MB. For a PDF, use the page that contains the complete floor plan.
Do I need to add measurements before conversion?
Measurements are optional, but one overall width and depth plus a few critical room dimensions can help communicate proportion. Mark estimated values as approximate.
How accurate is an AI floor plan conversion?
It is a first-pass planning image, not a measured survey or construction drawing. Check the footprint, openings, labels, proportions, and every dimension against the source.